Tracking online visitors update from Hitsteps

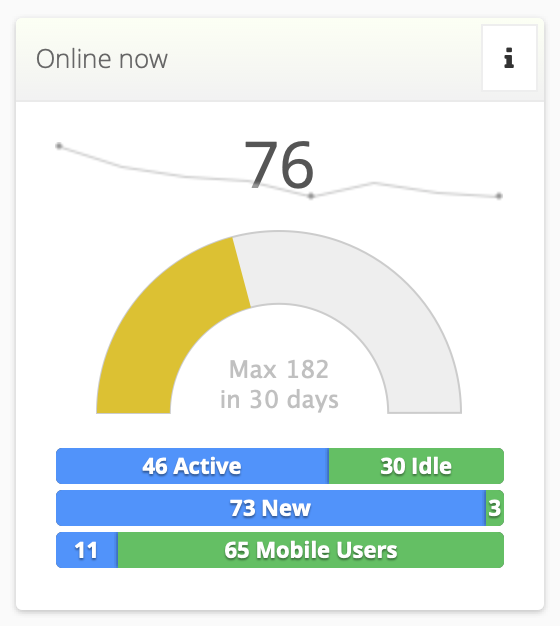
This update involve all of our customers. According to this update, you will see different number of active online visitors (probably lower) and higher number of idle visitors.

Hitsteps tracking engine developed back in 2013. In that time, Hitsteps web analytics competitors such as Clicky, Woopra, W3Counter or HiStats were detecting live online users using rough analysis.

Some such as W3Counter were just looking at last 10 minutes unique visitor page views and using it as live user counter. It served the purpose at that time and Hitsteps utilised this method.

As time goes by, we added a ping method to our analytics which ping your visitors every few seconds to ensure visitor remain online. We were then shifted from old method to a hybrid method of calculating between Active and Idle online visitors.

As of today, Hitsteps is using a completely revamped method to calculate online visitors. Hitsteps now look at your visitors activity, tab focus and other information to determine if visitor is online, idle or offline.

Now, if your visitor do not interact with your website (scrolling, moving mouse, clicking, …) or focus out from your website (opening another page in another tab, clicking on another window or minimising browser window), we will immediately mark this visitor as Idle.

Likewise, If browser window get focus, mouse movement or scroll, we will mark this visitor as Active online.

We believe this change is necessary in order to show accurate online active and online idle visitors. however it will cause our numbers to differ from previous version of Hitsteps Analytics and perhaps all other web analytics out there who are using old methods to detect online visitors.

How integrate NANO cryptocurrency payment gateway via Brainblocks to your website?

nano logo


Hitsteps accepted Nano cryptocurrency (formerly known as Raiblocks) as a way of payment for it’s services since early January 2018, we are excited about cryptocurrency as whole and specially about Nano cryptocurrency. We were using RaiPay.io as our payment processor gateway however they’ve gone offline and shutdown their service.

So we moved to BrainBlocks. At time of writing this article, brainblocks.io homepage provide a simple and efficient guide on how to create an “inline” nano payment button. however there is no guide on how to create a “hosted” payment gateway page while they DO offer this service as it can be seen in their woocommerce plugin. We are happy with their transaction processing time and their service, so we decided to provide this simple guide to encourage more merchants to accept Nano.

Brainblocks team provided a simple way for Shopify shop owners to accept nano as well as a WordPress plugin for those who use WooCommerce.

In this article, we will focus on how to create a “hosted” nano cryptocurrency payment gateway. We will use PHP for this example, but you can use it with all other languages.

You need to build your URL path to redirect user to brainblocks payment gateway page.

Section A: Opening BrainBlocks Hosted payment gateway page

Your nano wallet address as:
$destination = "xrb_.............";

USD or other currency amount to be paid by user:
$total = "99.99";

Currency that you are using for total amount above:
$currency = "usd";

At time of writing, brainblocks accept aud, brl, cad, chf, clp, cny, czk, dkk, eur, gbp, hkd, huf, idr, ils, inr, jpy, krw, mxn, myr, nok, nzd, php, pkr, pln, rub, sek, sgd, thb, try, usd, twd, zar currencies for price conversion.

Return URL after a successful payment: (order_id parameter is optional, it help you to pin point to exact order generated from your service)
$returnurl = "http://website.url/thankyoupage.php?order_id=xxx";

Return URL after a failed payment: (order_id parameter is optional)
$errorurl = "http://website.url/payagain.php?order_id=xxx";

and then build your brainblock url using variables defined above:
$brainblocks_url = 'https://brainblocks.io/checkout?payment.destination='
 . $destination . '&payment.currency=' . strtolower($currency) .
'&payment.amount=' . $total . '&urls.return=' . urlencode($returnurl) .
'&urls.cancel=' . urlencode($errorurl);

and then you redirect your visitor to this generated URL:
header(“Location: “.$brainblocks_url);

Section B: Verifying payment after it’s paid by customer

In example above, we used success return URL to be thankyou.php, so this instruction is regarding thankyou.php file.

BrainBlocks redirect user to your thankyou page with parameters you’ve provided and add an extra parameter named “token”. This token parameter will be returned as GET (on URL) however there is possibility that it get returned as POST as well. so you need to check for POST if GET token is empty.

In thankyou page, we validate Payment using Token code that is provided by brainblocks as json:
$brainblocks_data=(array) json_decode(
file_get_contents("https://brainblocks.io/api/session/".
$_GET['token']."/verify"),true);

now, we check to make sure full amount is paid by customer:
if ($brainblocks_data['fulfilled']){
//payment is successful and you can go on with processing the order
}else{
//payment has been failed or not full amount has been paid
}

This section B instruction can be used together with brainblocks’s inline payment button guide as well.

How include your visitors details when they send you an email?

We’ve introduced Contact form integration for hitsteps analytics a while ago, however lack of proper documentation caused lot of our customers still asking us how to use this feature! Here we guide you step by step on how to get it working.

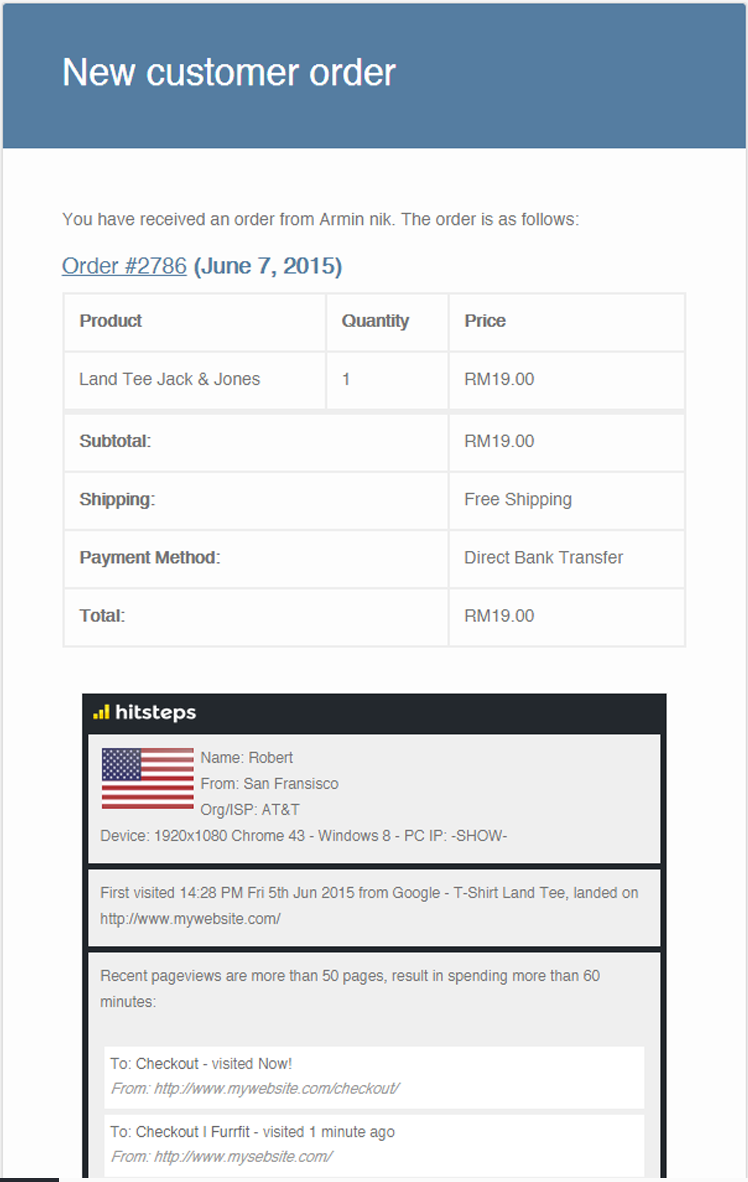
End result will be something like this at end of your incoming emails from your websites which shows your visitor information and pageview path:

wpemail

it is cool, isn’t it!? Go open a hitsteps account if you haven’t yet! It works with WooCommerce, Ninja Forms, Contact Form 7, Gravity Forms and even Jetpacks Contact forms! Yes, they are all WordPress plugins which we’ve integrated this function into them. for other kind of websites, you’ll need to manually integrate and code API into your site.

Here is how to configure it for each of these plugins:

WooCommerce

You don’t need to manually do anything for WooCommerce to enable it, it is enabled by default when you install and activate our plugin, you can disable it if you don’t want it from Setting > Hitsteps

Jetpacks

You don’t need to manually do anything for JetPacks to enable it too, it is enabled by default when you install and activate our plugin, you can disable it if you don’t want it from Setting > Hitsteps. There is a checkbox to disable it for jetpacks.

Contact Form 7

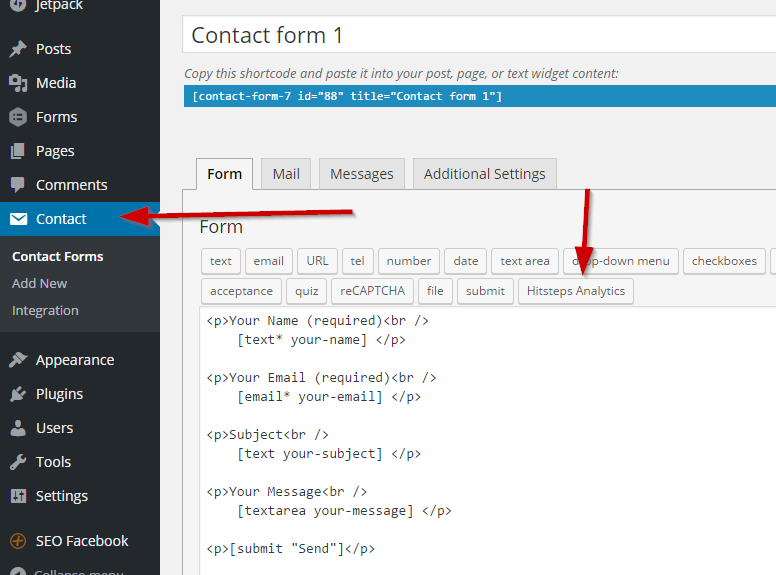
  1. Open your form to edit, and find Hitsteps Analytics button in your contact form.
    chrome_2016-04-18_16-35-11
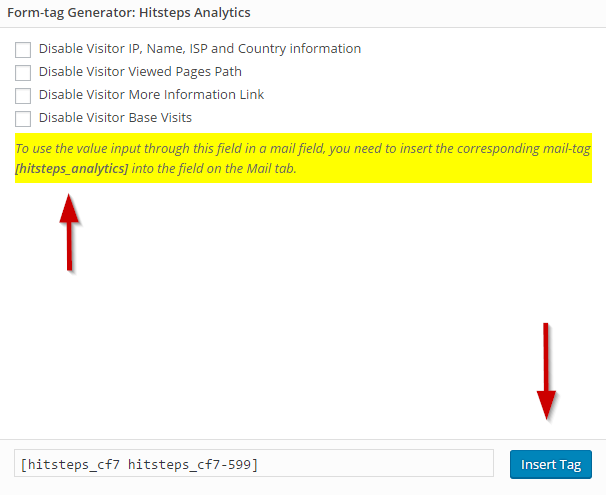
  2. A popup will open. Click on Insert Tag button to inject our code into contact form. It doesn’t matter where you will put this code. it is invisible to your visitors.
    chrome_2016-04-18_16-37-36
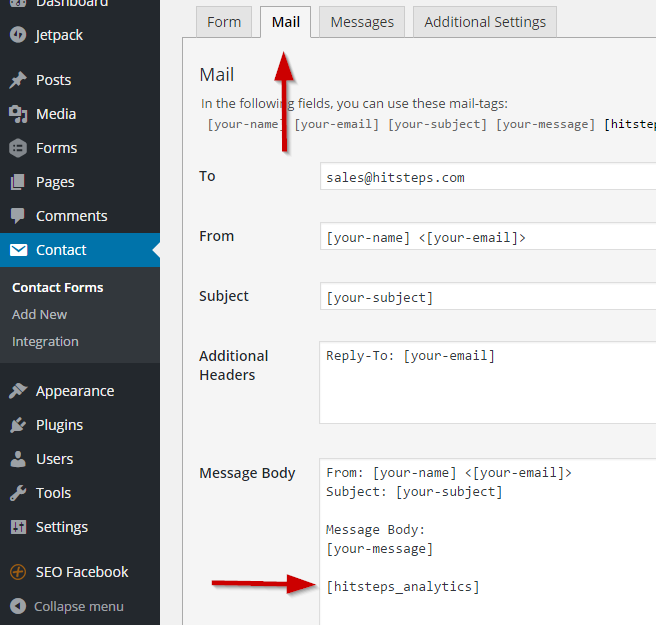
  3. Go to Mail Tab and enter [hitsteps_analytics] wherever you want visitor information to be displayed inside of the email.
    chrome_2016-04-18_16-39-35
  4. It is better to enable HTML email checkbox, so that you can receive a well organized report of your visitors.
  5. Enjoy knowing your visitors before replying to them!

Ninja Forms

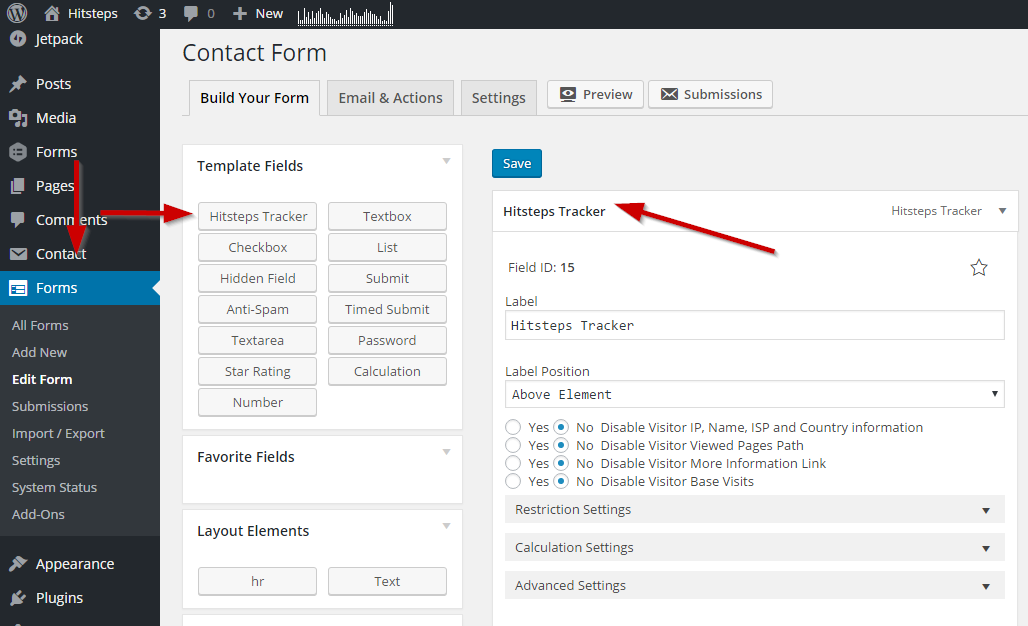
  1. Go to your ninja forms editor, and you can see Hitsteps Tracker button! Click on that button and save the form!
    chrome_2016-04-18_16-51-11
  2. Make sure you put Hitsteps tracker as last field in your form. It will be invisible to your users.
  3. That’s all!

Gravity Forms

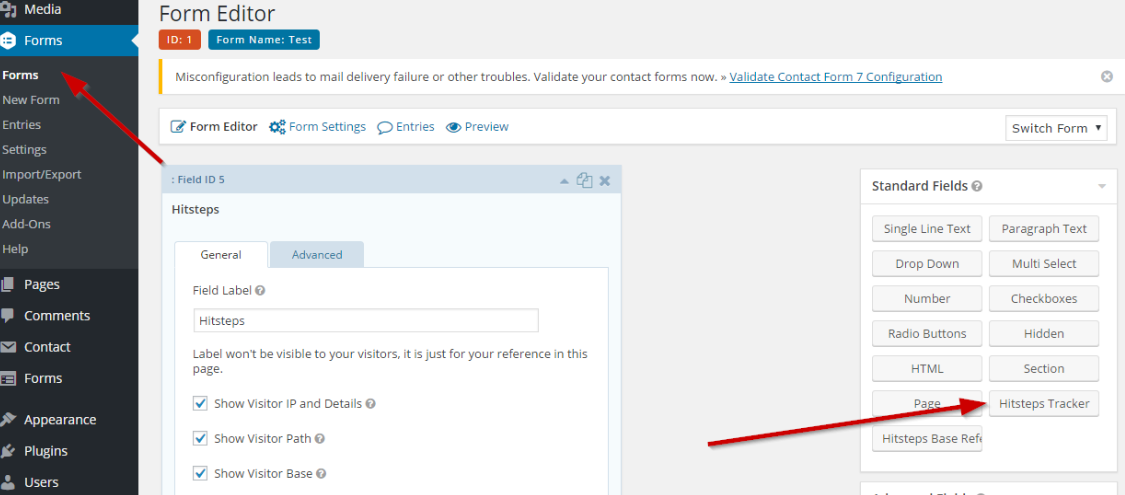
  1. Go to your Gravity Forms Form Editor and you can see Hitsteps Tracker in list.
    chrome_2016-04-18_17-22-17
  2. Drag hitsteps tracker into your form and Update the form to save changes.
  3. It is all ready 🙂

Manual Integration API

We have manual integration API for those who are not using WordPress, you need to have PHP programming skill to do it or to hire a developer to do it for you. You need to download our wordpress plugin file and look at one of the integrations, say contact form 7 and use that as documentation.

Copy large files between servers

There is an issue we faced while part of our database to another server far far away for performance and stability. However, SCP appears to transfer at 2MB/s where network was 10MB/s. we cancelled transfer and used alternatives.

What are alternatives you can use?

First, you can speed up SCP by turning on compression which will have a slight effect:

scp -C -o 'IPQoS throughput' -o 'CompressionLevel 9'  -c arcfour file

however, there seems to be some issue when transfer time passed 5 minutes, it just get slow and slower due to network latency. Rsync was not an option as we needed a parallel way.

If your both servers are in same data center, then either rsync or scp would do just fine, but in our case, We came up with Axel! it is not quite similar to others, but does job perfectly. It works excellent when data centers are far away.

Axel is a parallel HTTP downloader which support resume, and can download as fast as available bandwidth. Transfer time has been cut down to 30 minutes and 10MB/s (fastest our network support)

A simple command can such as:

axel -a -v -n 8 http://domain.com/somerandomfolder/largefile.zip

can do the job and use maximum capacity of your internet. However be aware that once you copy a file in your HTTP address it will be accessible to the world, make sure URL is kept secret and you delete file from URL as soon as download is finished.

You might need to install axel via

yum install axel
apt-get install axel

DNS Load Balancing and Auto IP Failover

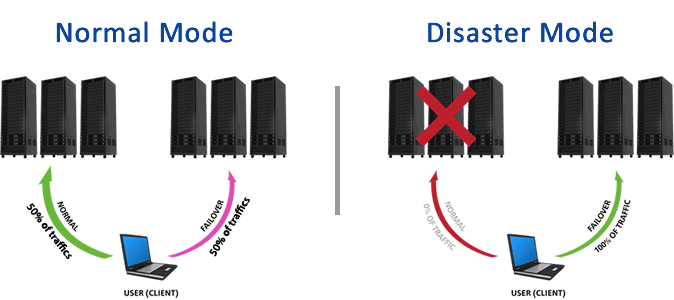
We had a scenario here, which we needed to distribute load between few servers, buying a load balancer was not an option (or at least we wanted to experiment with DNS Load balancing) and it worked great.

Afterall, A load balancer is just another point of break in case your load balancer crash!

Please note that this load balancing won’t check status of servers and randomly return IP addresses (but your visitor won’t see a crashed server!)

Another side effect is that DNS load balancer won’t keep same visitor on same server on each page refresh or link change, so you need a shared session for all servers.

PHP’s default session uses file system and isn’t made for sharing between servers, so you’ll need a shared session manager. memcached is a great option here. sync all your server PHP sessions by connecting them to memcached of a server.

Next step, you need to make sure your database is replicated as master-master and file system is synced (you can use lsyncd for file system sync)
If you have more than 2 servers, you might need to use MySQL 5.7 above, because they offer multi-source master replication, so your slave server can connect to 2 masters at same time.
Before MySQL 5.7, multi-master replication was done using round robin replication which causes big problem in case one of servers go offline.

Now, lets see what will happen when you add multiple A records to your DNS.
so, lets say we have this record:

A   www.hitsteps.com   123.123.123.123

We change it to:

A   www.hitsteps.com   123.123.123.123
A   www.hitsteps.com   123.123.123.124

Where 123.123.123.123 is your first server’s IP address and 123.123.123.124 is your second server IP address.

And it is done!

So here is what happens in our experience. Browser randomly choose one of these IP addresses. since file system and session and database is cached, visitor will always see correct page regardless of which server he is connected to.
It is really random and we cannot

Now, if one of your servers crash and IP address become unavailable, browser will choose another available IP address, therefor your visitors won’t see any downtime. Once crashed server come back online, browser will start serving pages using this server again.

Cloudflare Automatic IP Failover

Update: Starting 9th November 2016, Cloudflare will no longer support API v1 which we’ve used in this post. You may look for migrating to v4 and example scripts such as lyoshenka’s great work 😉
Howver you can read our explaination below to figure out how we achieve Failover using CloudFlare service

We use Cloudflare for our service and we use it to have server switchover or failover in case our main server go down, and it been working perfectly ever since!

Wouldn’t it be perfect to have a DNS failover, saving costs by avoiding a hardware and also reduce risk of having main load balancer go down? It is possible to have DNS Load balancing by having two IP Addresses point to same record A, but we go for it in another article.

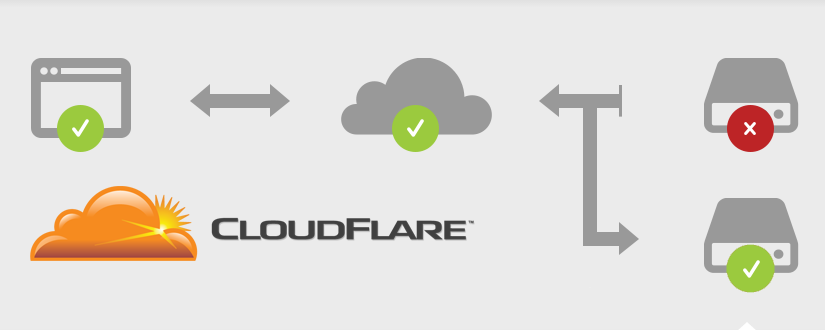
In this article we will cover how to have CloudFlare perform automatic IP failover for your servers, so in case main server go down, backup server kick in.

Please note for this to work seamlessly, you need your backup server be exactly same as main server. You can achieve this by having MySQL replicated and file system synced using lsyncd. You can also have your backup server show a temporarily message.

If you were to use a real DNS to set IP, it would take hours for new IP to apply to DNS servers around globe, and your visitors would still get pointed to crashed server but not with Cloudflare. new DNS will kick in less than few minutes (1min approx, and max 5mins)

You will need to run monit server in your backup server, ideally you can run monit on a separate server which only have monit server on it. You can get a simple and budget friendly vps linux cloud server from vpsdime and have it check status of your main server.

Let’s cut it short and get to instructions!

Please get your API key from Cloudflare. You can get it from Account tab in cloudflare. Cloudflare is free!

Then you need to shell scripts, one to change IP to backup, and one to change IP to main. Here we have provided both scripts for you. You can download them HERE and set appropriate configs into both files (IP addresses, cloudflare key, email address…)

You need to upload files in your backup server, in this example we use folder /hitsteps/cloudflare/

type in ssh console:

mkdir /hitsteps/
mkdir /hitsteps/cloudflare/

and then upload configured files there.
Make sure you give execute permission to this two files:

chmod +x /hitsteps/cloudflare/*.sh

Now, you need to install monit in your backup server:

yum install monit (or apt-get install monit)

and configure your monit to check your main server status by editing /etc/monit or /etc/monitrc and add following lines to end of it, edit 0.0.0.0 with your main server IP address and change alert email address to your address:

check host 0.0.0.0 with address 0.0.0.0
alert your@email.com
if failed icmp type echo count 3 with timeout 3 seconds for 2 cycles then exec "/bin/bash -c /hitsteps/cloudflare/tobackup.sh"
else if succeeded for 2 cycles then exec "/bin/bash -c /hitsteps/cloudflare/tomain.sh"
if failed url http://0.0.0.0/ with timeout 20 seconds and retry 2 for 2 cycles then exec "/bin/bash -c /hitsteps/cloudflare/tobackup.sh"
#else if succeeded for 2 cycles then exec "/bin/bash -c /hitsteps/cloudflare/tomain.sh"

Now you need to restart monit, and make sure it run on startup:

service monit restart
chkconfig monit on

Guess what? It is all ready! You’ve just setup an auto IP Fail Over using Cloudflare.

Now, monit will check status of your main server by pinging it, if ping failed for 3 times on 3 cycles, then it will fire tobackup.sh file, same will happen if it cannot access webserver for 2 times.
Once server is accessible, it will run tomain.sh.

tobackup.sh will connect to cloudflare API and change your domain IP addresses to backup server. this change usually apply in less than 1 minute by our experience. monit will keep monitor your main server status and change IP back once it is accessible again.

As a sidenote, your cloudflare folder which contain scripts should have write permission because it will write logs into it. you also need to have following apps installed in your linux box for tomain.sh and tobackup.sh parse cloudflare API correctly: bc, cut, curl, sed, head, python

yum install python bc cut curl sed head

Do you have any suggestion to enhance this script? or any feedback? Please do let us know!
How fast are SSD servers? Performance comparison between HDD vs SSD

SSD make difference!

We’ve been hearing that SSD hard disks are new generation and therefor, all database intensive servers have to move to new SSD servers. We gave it a shot and we never regret it!

In hitsteps, we analyze thousands of hits per seconds. this hits then categorized and processed by a background processor, and archived somewhere along with millions of other hits!

Given searching a visitor or looking back into archive of a visitor is an essential feature of hitsteps, we always had to struggle with performance of database searches, specially when searching for some visitors who visited months ago.

MySQL databases need RAM to hold all indexes of data, they also need a fast disk in case data are not in RAM. so we did the test in a mirrored server:

Our search parameter was a simple query of “Searching for a visitor for who visited hitsteps dashboard who are from Canada since 6 months ago”

HDD server took 45 seconds to return query (almost near to timeout in most apache web server setups). SSD server took only 6 seconds to return query. Going to page number 2 in HDD took 15 seconds, in SSD just a wee 2 seconds.

It worth mentioning all other simple queries take less than 0.2 seconds in SSD servers and 0.5 in HDD servers.

Please do note that this times are closed source and relative to our script and codes. It might be different with other Applications, codes and scripts you might use in your server. RAM also play a major role here which is more appearance if your server is using HDD.

Make widgets in your plugin compatible for WordPress v4.3

WordPress v4.3 is just a week and half away to be released and it is a major update for developers!

WordPress team being innovative again and deprecated PHP4 style classes in old WordPress, therefor, your plugin is going to show an ugly error in case you use WP_Widget class to show a widget in your website sidebar.

We use hitsteps live support widget and statistics widget in our plugin, so we had to update our codes too and…

Here is what to do!

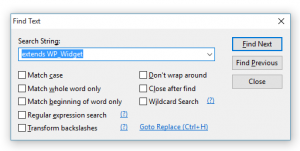
Open your editor and search for any reference to “extends WP_Widget”

2015-08-09_01-18-49

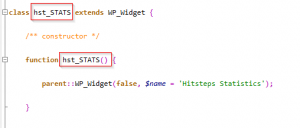
Your widget class have a name, and most probably (PHP4 style), name of your plugin is used as a function inside of same class. Look here, here’s ours:

2015-08-09_01-22-06

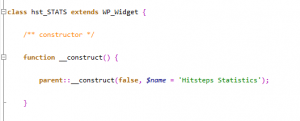
Now, change function name to __construct(). this is new way of defining default function of a class.

And inside of that function, you’ll have a code that call WP_Widget.
It can be parent::WP_Widget, $this->WP_Widget, {something}->WP_Widget… which all are deprecated!

You have to change that to parent::__construct(…);

Here is how it should look like after you done all this changes:

2015-08-09_01-26-15

Number of “extends WP_Widget” lines you have match number of widgets your plugin create. You’ll need to repeat this process for each of them.

Congrats! Your plugin is officially compatible with WordPress v4.3

If you wish to read more about this, you can read this and this from official WordPress team.

We have just released our update for WordPress v4.3 users today, so you can expect a smooth upgrade to new WordPress regarding our analytics service 🙂